Để kết nối nhanh và kiểm tra service trong Kubernetes Cluster, bạn có thể sử dụng kubectl port-forward. Lệnh này cho phép bạn chuyển tiếp các cổng từ một Pod trên Kubernetes Cluster đến máy cục bộ của bạn.
Ví dụ, nếu bạn muốn kiểm tra Service có tên “my-service” trên namespace “my-namespace” và chuyển tiếp cổng 8080 của Pod của Service đó đến cổng 8080 trên máy cục bộ, bạn có thể sử dụng lệnh sau:
kubectl port-forward service/my-service 8080:8080 -n my-namespaceSau đó, bạn có thể truy cập Service này thông qua địa chỉ http://localhost:8080 trên máy cục bộ của mình.
Giả sử mình có service MySql đang chạy wordpress như dưới. Nếu như bạn không sử dụng port-forward thì bạn chỉ có cách vào trực tiếp container để thao tác bằng command line.
$ kubectl get svc -n wiki-hoanghd
NAME            TYPE           CLUSTER-IP       EXTERNAL-IP      PORT(S)        AGE
website-mysql   ClusterIP      10.101.131.3     <none>           3306/TCP       68m
website-wp      LoadBalancer   10.102.255.126   192.168.13.208   80:32181/TCP   68m
Ngay bây giờ mình sẽ chạy lệnh kubectl port-forward service/website-mysql 33306:3306 -n wiki-hoanghdđể expose cổng 3306 -> 33306. Và bây giờ tại máy local bạn có thể truy cập vào cổng 3306 bằng cổng đã expose 33306. Khi bạn bấm Ctrl + C lập tức port-forward sẽ dừng lại và ngắt kết nối.
$ kubectl port-forward service/website-mysql 33306:3306 -n wiki-hoanghd
Forwarding from 127.0.0.1:33306 -> 3306
Forwarding from [::1]:33306 -> 3306
Nếu bạn muốn các máy ngoài máy local kết nối tới thì bạn có thể sử dụng Kubernetes Service Type là NodePort để cho phép kết nối vào port của Service thông qua IP của các Node trong cluster.
Để sử dụng Service Type là NodePort, bạn cần sửa file YAML của Service thành như sau:
apiVersion: v1
kind: Service
metadata:
  name: website-mysql
  namespace: wiki-hoanghd
spec:
  selector:
    app: website-mysql
  type: NodePort
  ports:
    - name: mysql
      port: 3306
      nodePort: 30000 # Chọn một cổng NodePort không bị sử dụng
Sau khi apply file YAML, Service của bạn sẽ được map đến một cổng trên Node, ví dụ: <node_ip>:30000. Bạn có thể kết nối vào địa chỉ này để kết nối đến Service website-mysql từ bất kỳ đâu trên mạng.
Nếu bạn muốn chỉnh sửa service hiện tại đang chạy, bạn hãy sử dụng lệnh chỉnh sửa service kubectl edit svc/<tên service> -n <namespace>.
kubectl edit svc/website-mysql -n wiki-hoanghdLúc này giao diện chỉnh sửa sẽ hiện ra, bạn có thể chỉnh sửa thao tác như sử dụng vi hoặc vim.
# Please edit the object below. Lines beginning with a '#' will be ignored,
# and an empty file will abort the edit. If an error occurs while saving this file will be
# reopened with the relevant failures.
#
apiVersion: v1
kind: Service
metadata:
  annotations:
    kubectl.kubernetes.io/last-applied-configuration: |
      {"apiVersion":"v1","kind":"Service","metadata":{"annotations":{},"labels":{"app":"website-mysql"},"name":"website-mysql","namespace":"wiki-hoanghd"},"spec":{"ports":[{"port":3306}],"selector":{"app":"website-mysql"}}}
  creationTimestamp: "2023-05-14T12:09:01Z"
  labels:
    app: website-mysql
  name: website-mysql
  namespace: wiki-hoanghd
  resourceVersion: "808333"
  uid: 42db98e9-911b-4c6e-8002-64db44c75b16
spec:
  clusterIP: 10.101.131.3
  clusterIPs:
  - 10.101.131.3
  internalTrafficPolicy: Cluster
  ipFamilies:
  - IPv4
  ipFamilyPolicy: SingleStack
  ports:
  - port: 3306
    protocol: TCP
    targetPort: 3306
  selector:
    app: website-mysql
  sessionAffinity: None
  type: ClusterIP
status:
  loadBalancer: {}
Bạn hãy để ý tại phấn type: ClusterIP, hãy chỉnh sửa lại type: NodePort và lưu lại. Và dưới đây là kết quả sau khi chỉnh sửa.
# Please edit the object below. Lines beginning with a '#' will be ignored,
# and an empty file will abort the edit. If an error occurs while saving this file will be
# reopened with the relevant failures.
#
apiVersion: v1
kind: Service
metadata:
  annotations:
    kubectl.kubernetes.io/last-applied-configuration: |
      {"apiVersion":"v1","kind":"Service","metadata":{"annotations":{},"labels":{"app":"website-mysql"},"name":"website-mysql","namespace":"wiki-hoanghd"},"spec":{"ports":[{"port":3306}],"selector":{"app":"website-mysql"}}}
  creationTimestamp: "2023-05-14T12:09:01Z"
  labels:
    app: website-mysql
  name: website-mysql
  namespace: wiki-hoanghd
  resourceVersion: "808333"
  uid: 42db98e9-911b-4c6e-8002-64db44c75b16
spec:
  clusterIP: 10.101.131.3
  clusterIPs:
  - 10.101.131.3
  internalTrafficPolicy: Cluster
  ipFamilies:
  - IPv4
  ipFamilyPolicy: SingleStack
  ports:
  - port: 3306
    protocol: TCP
    targetPort: 3306
  selector:
    app: website-mysql
  sessionAffinity: None
  type: NodePort
status:
  loadBalancer: {}
Hệ thống tự động cập nhật trạng thái service nên sau khi lưu lại bạn sử dụng lệnh kubectl get svc -n wiki-hoanghd, bạn sẽ nhìn thấy service website-mysql với type đã chuyển từ ClusterIP sang NodePort và tại phần Port nó đã expose cổng 3306 -> 31711.
$ kubectl get svc -n wiki-hoanghd
NAME TYPE CLUSTER-IP EXTERNAL-IP PORT(S) AGE
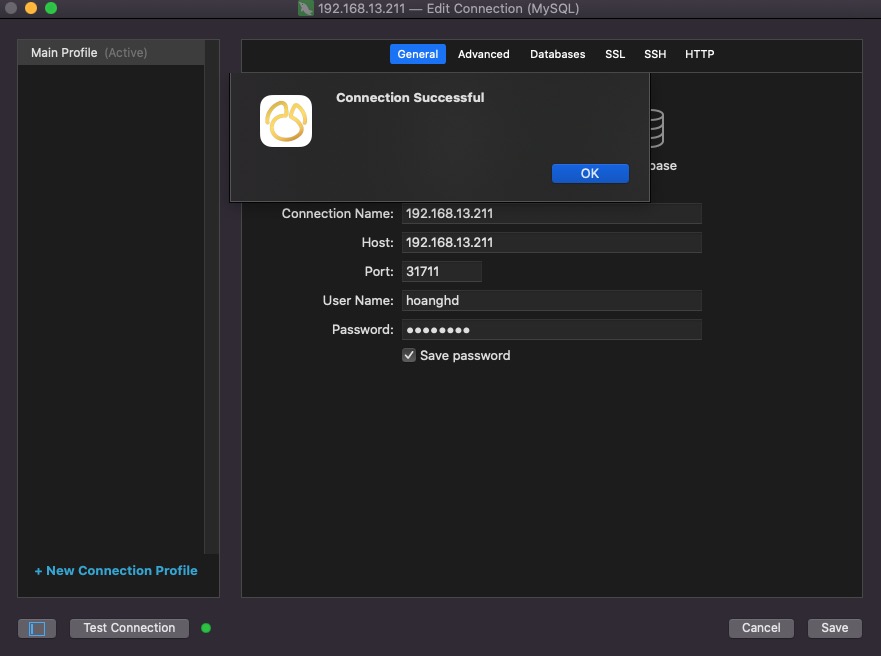
website-mysql NodePort 10.101.131.3 <none> 3306:31711/TCP 77m
website-wp LoadBalancer 10.102.255.126 192.168.13.208 80:32181/TCP 77mLưu ý nếu bạn không truyền cổng expose (ví dụ nodePort: 30000) thì hệ thống tự động gắn cho bạn 1 port bất kỳ nằm trong range NodePort đã được định nghĩa từ trước nhé.
Giờ bạn có thế dùng IP của một node bất kỳ trong cụm để truy cập vào port 3306 của MySql. Chúng ta sử dụng lệnh kubectl get no -A -owide để lấy danh sách IP các node trong cụm.
$ kubectl get no -A -owide
NAME      STATUS   ROLES                  AGE     VERSION   INTERNAL-IP      EXTERNAL-IP   OS-IMAGE             KERNEL-VERSION       CONTAINER-RUNTIME
master1   Ready    control-plane,master   2d20h   v1.23.8   192.168.13.211   <none>        Ubuntu 18.04.6 LTS   4.15.0-200-generic   containerd://1.6.14
master2   Ready    control-plane,master   2d20h   v1.23.8   192.168.13.212   <none>        Ubuntu 18.04.6 LTS   4.15.0-200-generic   containerd://1.6.14
master3   Ready    control-plane,master   2d20h   v1.23.8   192.168.13.213   <none>        Ubuntu 18.04.6 LTS   4.15.0-200-generic   containerd://1.6.14
worker1   Ready    <none>                 2d20h   v1.23.8   192.168.13.214   <none>        Ubuntu 18.04.6 LTS   4.15.0-210-generic   containerd://1.6.14
worker2   Ready    <none>                 2d20h   v1.23.8   192.168.13.215   <none>        Ubuntu 18.04.6 LTS   4.15.0-200-generic   containerd://1.6.14
worker3   Ready    <none>                 2d20h   v1.23.8   192.168.13.216   <none>        Ubuntu 18.04.6 LTS   4.15.0-200-generic   containerd://1.6.14
worker4   Ready    <none>                 2d20h   v1.23.8   192.168.13.217   <none>        Ubuntu 18.04.6 LTS   4.15.0-200-generic   containerd://1.6.14
worker5   Ready    <none>                 2d20h   v1.23.8   192.168.13.218   <none>        Ubuntu 18.04.6 LTS   4.15.0-210-generic   containerd://1.6.14
Giờ bạn có thể sử dụng một máy tính bất kỳ ở ngoài có kết nối đến các IP trong cụm và kiếm tra kết quả, dưới đây là kết quả telnet.
$ telnet 192.168.13.211 31711
Trying 192.168.13.211...
Connected to 192.168.13.211.
Escape character is '^]'.
J
5.6.51FYj*/Nx�B'>?bPJa-VM^mysql_native_password
Và đây là kết quả khi sử dụng 1 phần mềm bất kỳ, ví dụ Navicat.