🧩 Tổng quan
Hiện nay HTTPS rất phổ biến, việc log đầy đủ URL người dùng truy cập – đặc biệt là đường dẫn chi tiết của các trang HTTPS – là điều không hề dễ dàng. Hầu hết proxy truyền thống chỉ log được hostname (VD: https://www.youtube.com), nhưng không log được path chi tiết (VD: /watch?v=abc123).
Để giải quyết vấn đề này, Squid cung cấp tính năng SSL Bump – cho phép chặn và giải mã kết nối HTTPS để phân tích và log chi tiết request của người dùng. Bài viết này sẽ hướng dẫn bạn từng bước cài đặt Squid Proxy kết hợp SSL Bump để có thể ghi lại full URL kể cả HTTPS, giúp tăng cường giám sát hoặc lọc nội dung.
⚙️ Mô hình hoạt động
+-------------+        HTTPS         +---------+       HTTP/HTTPS       +----------+
|  Client PC  |  <---------------->  |  Squid  |  <-------------------> | Internet |
+-------------+ (SSL Bump Intercept) (Forward/Cache Proxy)- Squid đóng vai trò “man-in-the-middle” để giải mã và log lại kết nối HTTPS
- Một CA giả lập được tạo và cài vào trình duyệt client để tránh cảnh báo bảo mật
🛠️ Hướng dẫn cài đặt chi tiết
Cài đặt các gói cần thiết
apt update
apt install squid-openssl net-tools -y
Tạo CA giả lập để SSL Bump
mkdir -p /etc/squid/ssl_cert
cd /etc/squid/ssl_cert

openssl req -new -newkey rsa:2048 -days 3650 -nodes -x509 \
    -keyout myCA.key -out myCA.pem -subj "/CN=SquidCA"

cat myCA.pem myCA.key > myCA.crt

chown -R proxy:proxy /etc/squid/ssl_cert
chmod -R 700 /etc/squid/ssl_cert
⚠️ Lưu ý: bạn sẽ cần import myCA.pem vào trình duyệt client để tránh lỗi chứng chỉ khi truy cập HTTPS.
Khởi tạo database cho chứng chỉ động
/usr/lib/squid/security_file_certgen -c -s /var/lib/ssl_db -M 4MB
chown -R proxy:proxy /var/lib/ssl_db

mkdir -p /var/spool/squid
chown proxy:proxy /var/spool/squid

/usr/lib/squid/security_file_certgen -c -s /var/spool/squid/ssl_db -M 4MB
chown -R proxy:proxy /var/spool/squid/ssl_db
chmod 700 /var/spool/squid/ssl_db
Cấu hình squid.conf
# === SSL Certificate Generation Setup ===
sslcrtd_program /usr/lib/squid/security_file_certgen -s /var/lib/ssl_db -M 4MB  # Generates dynamic SSL certs for bumped HTTPS sites
sslcrtd_children 5  # Number of helper processes to handle SSL certificate generation

# === HTTPS Port with SSL Bump Enabled ===
http_port 3128 ssl-bump generate-host-certificates=on dynamic_cert_mem_cache_size=16MB \
    cert=/etc/squid/ssl_cert/myCA.pem key=/etc/squid/ssl_cert/myCA.key  # Proxy port with SSL bumping enabled using custom CA

# === SSL Bump Phases ===
acl step1 at_step SslBump1  # ACL for first bumping step (before handshake)
acl step2 at_step SslBump2  # ACL for second step (after server hello)
acl step3 at_step SslBump3  # ACL for final decision

# === SSL Bump Rules ===
ssl_bump peek step1  # Peek at SSL handshake to read SNI (Server Name Indication)
ssl_bump stare step2  # Fully analyze the handshake (required for deeper inspection)
ssl_bump bump step3  # Proceed to decrypt and inspect the connection

# === Allow Invalid or Self-Signed Certificates ===
sslproxy_cert_error allow all  # Do not block connections with certificate errors

# === Block URLs with Specific Keywords (e.g., adult content) ===
acl bad_sites url_regex -i sex xvideos  # Match URLs containing "sex" or "xvideos"
http_access deny bad_sites  # Block access to those URLs

# === Allow All Other Requests ===
http_access allow all  # Allow all remaining traffic

# === Log Configuration in JSON Format ===
# Define custom JSON log format
logformat custom_json {"ts":"%tl","client":"%>a","code":"%>Hs","status":"%Ss","bytes":%<st,"method":"%rm","url":"%ru","hier":"%Sh/%<a","content_type":"%mt"}

# Log to access.json using the above format
access_log /var/log/squid/access.json custom_json

# === Performance Tuning Settings ===
cache_mem 1024 MB  # Allocate 1GB of RAM for in-memory object caching
max_filedescriptors 65535  # Max open file descriptors (tune OS limits too)

# === Disk Cache Directory and Parameters ===
cache_dir ufs /var/spool/squid 1000 16 256  # Use UFS for on-disk cache (1000MB, with 16 first-level and 256 second-level subdirs)

# === Object Size Limits ===
maximum_object_size 20 MB  # Do not cache files larger than 20MB
minimum_object_size 0 KB  # Cache all objects above 0KB

# === DNS Servers ===
dns_nameservers 8.8.8.8 8.8.4.4  # Use Google's public DNS servers

# === Request Pipeline Optimization ===
pipeline_prefetch 3  # Allow prefetching up to 3 pipelined HTTP requests

# === Refresh Patterns for Object Expiration Control ===
refresh_pattern ^ftp:           1440    20%     10080  # FTP: expire after 1 day, max 7 days
refresh_pattern ^gopher:        1440    0%      1440    # Gopher: 1 day only
refresh_pattern -i (/cgi-bin/|\?) 0     0%      0       # Never cache dynamic URLs
refresh_pattern .               0       20%     4320    # Default: up to 3 days with 20% freshness extension

# === Crash Dump Directory ===
coredump_dir /var/spool/squid  # Where Squid stores core dumps (for debugging crashes)
Lưu ý rằng sau khi thay đổi config, bạn có thể kiểm tra lỗi cú pháp bằng lệnh dưới.
squid -k parse Và bạn có thể Reload Squid để áp dụng thay vì phải systemctl restart squid (cách này bắt buộc Squid phải đang running nhé).
squid -k reconfigureTối ưu hệ thống (tăng số file descriptors)
Mở file /etc/security/limits.conf và thêm vào.
* hard nofile 65535
* soft nofile 65535
Mở file /etc/sysctl.conf và thêm vào.
fs.file-max = 2097152
net.core.rmem_max = 16777216
net.core.wmem_max = 16777216
net.ipv4.ip_local_port_range = 1024 65535
Áp dụng config mới.
sysctl -pKiểm tra và khởi động Squid
squid -k parse
squid -z
systemctl restart squid
systemctl enable squid
systemctl status squid
Port TCP/3128 của Squid đã listen
shell> netstat -tlnp | grep squid
tcp6       0      0 :::3128                 :::*                    LISTEN      26296/(squid-1)
📋 Ví dụ kết quả log
Sau khi hoạt động, file /var/log/squid/access.json sẽ có nội dung như:
{
  "ts":"27/Jun/2025:13:30:15 +0000",
  "client":"192.168.1.100",
  "code":"200",
  "status":"TCP_MISS",
  "bytes":12345,
  "method":"GET",
  "url":"https://stacklab.vn/block-size-va-nguyen-nhan-lam-so-o-dia-bi-giam-hieu-nang/",
  "hier":"DIRECT/203.113.130.12",
  "content_type":"text/html"
}
Đây chính là full URL HTTPS mà bình thường proxy không thể ghi lại.
Hướng dẫn chi tiết trên client.
Đầu tiên hãy trỏ proxy, mình demo bằng trình duyệt Firefox.
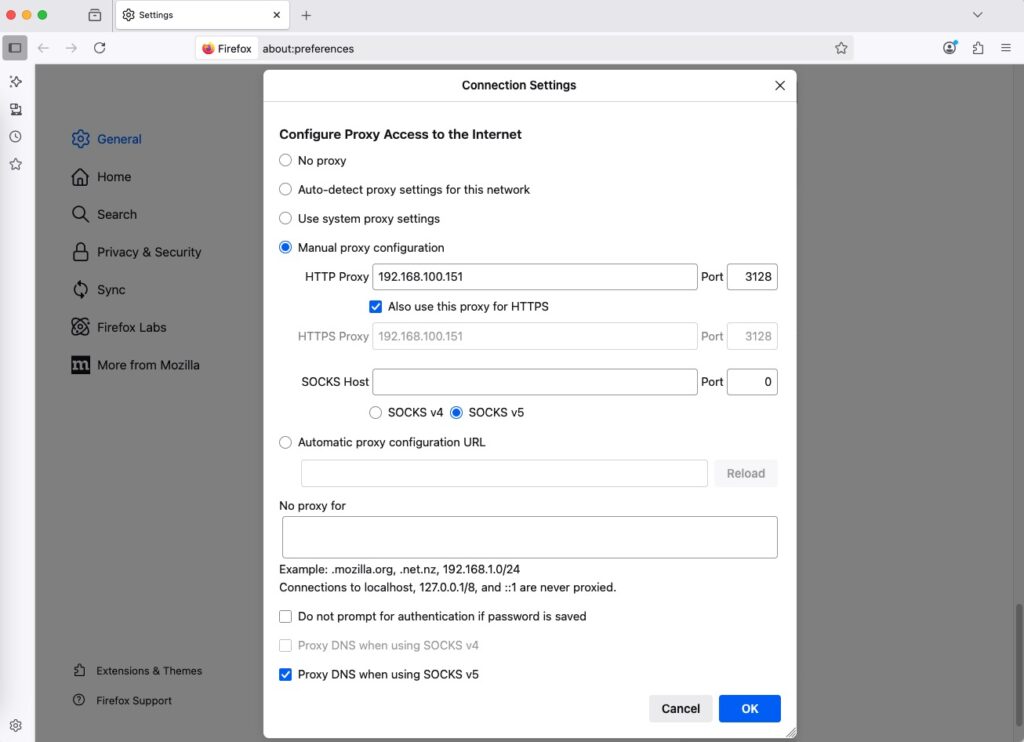
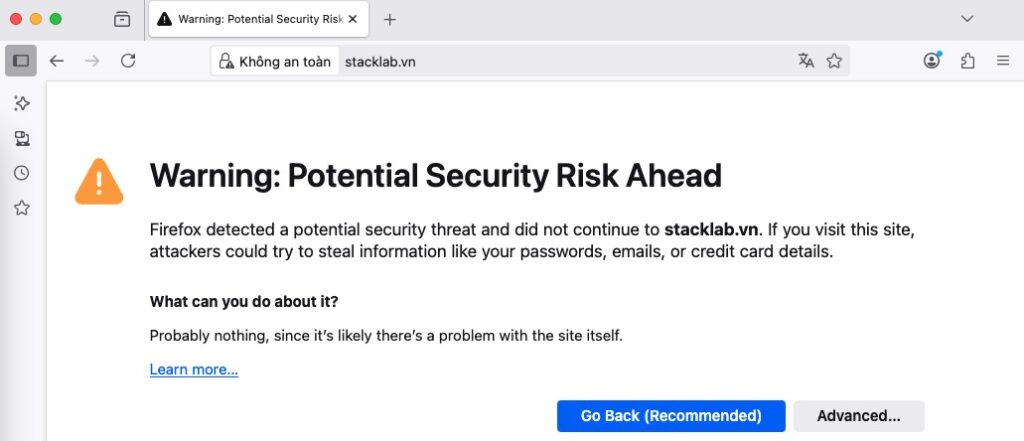
Nếu không thêm chứng chỉ của Squid vào hệ thống thì bạn sẽ nhận được cảnh báo không bảo mật như dưới.
Trên macOS (Windows các bạn tự mò nhé do mình không có máy Windows), để trình duyệt (Safari, Chrome, Firefox) chấp nhận chứng chỉ CA của Squid (/etc/squid/ssl_cert/myCA.pem) cho SSL Bump, bạn cần cài đặt chứng chỉ vào hệ thống và trình duyệt. Sẽ có 2 cách phổ biến để thêm chứng chỉ vào hệ thống.
Cách 1 – Thêm trực tiếp vào hệ thống (cách này tất cả các trình duyệt có sẵn trên hệ thống ví dụ Safari, Chrome, Firefox đều sẽ đọc được chứng chỉ).
Bước 1: Copy file CA sang máy macOS
Từ server Squid (Linux), copy file nội dung file myCA.pem sang máy Mac.
shell> cat /etc/squid/ssl_cert/myCA.pem
-----BEGIN CERTIFICATE-----
MIIDBTCCAe2gAwIBAgIULgO3EuvmgCoWROnoFOJ2jYwkXzowDQYJKoZIhvcNAQEL
BQAwEjEQMA4GA1UEAwwHU3F1aWRDQTAeFw0yNTA2MjcxMzE0MjhaFw0zNTA2MjUx
MzE0MjhaMBIxEDAOBgNVBAMMB1NxdWlkQ0EwggEiMA0GCSqGSIb3DQEBAQUAA4IB
DwAwggEKAoIBAQCyypv4VArMeBn5tPJAwJZUnd3Y6165FUtg1fuw99HO4qUWJj3k
7VwUpWA1Zjd62W4BFHvC41ZlVFwpV0iLWQJ0S9Gg1ZfUk1N+7Q+oZ970zsER1aZy
7v++f16vn6ctBZhrwOHA2p/hchgV00wZL6wMZ4Hukfh4ZHCXJvEm6H8klNTtKqmp
MNxJmqaqGDZEip4VXsu2i2n+Ss6h3awswLlRxhhOigfz6Yaq2KhBHpuQx8Nnj6Mr
CnE4iSuBlbgF338bzbBJA4RCX/Wphqc7ZXkikeggRXY4YDCGcrANpPJ0QS98yqSY
4mKZiJ5AhjSKizhQXNwf8+hq2weUbVr/E9GtAgMBAAGjUzBRMB0GA1UdDgQWBBRp
kCsFJ0SoIwiruA5OIKPNzOyq3TAfBgNVHSMEGDAWgBRpkCsFJ0SoIwiruA5OIKPN
zOyq3TAPBgNVHRMBAf8EBTADAQH/MA0GCSqGSIb3DQEBCwUAA4IBAQB6bhywxypP
qGuuj6rC+cDuxV3k4tr45wc2wEBRsPC9AJYePzia5c8Y7ComQI01pC3CA/waeQkb
1lLNF9ssgpNKvX7e3f93zLjBrImARnmFnp1cHUoU4u8RGH5+2Y0WWJnA5oVOzVYw
FImH8ZtgYs4MLsXf/dvhAj2xfluf31ncOsdQJK2ZmX2Y7yfFb2FmMlyP3exH66jn
DvV5wiqqKCy896pCl8ZXZnM6LflHtssYUEEPs3yp2zkk8dwxWVZCkcSPLiFCKBqA
PpPwjOjwAMiwZFUF3raYMtOtpMEfnuDR889iZiGiCy3zN4/Z1TVRTSQFkEtPbNgb
UjFNV3+H9peJ
-----END CERTIFICATE-----
Bước 2: Thêm chứng chỉ vào hệ thống macOS (Keychain Access)
Mở ứng dụng “Keychain Access”. Bạn có thể tìm nó trong Spotlight (Cmd + Space, gõ “Keychain Access”).
Ở menu bên trái, chọn System ➝ và đảm bảo bạn đang ở tab, bấm vào file -> import items.
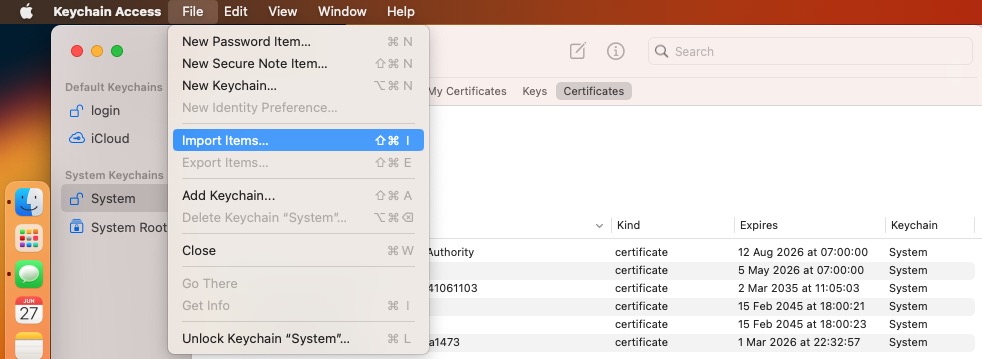
Chọn file myCA.pem từ ~/Downloads vào cửa sổ Keychain.
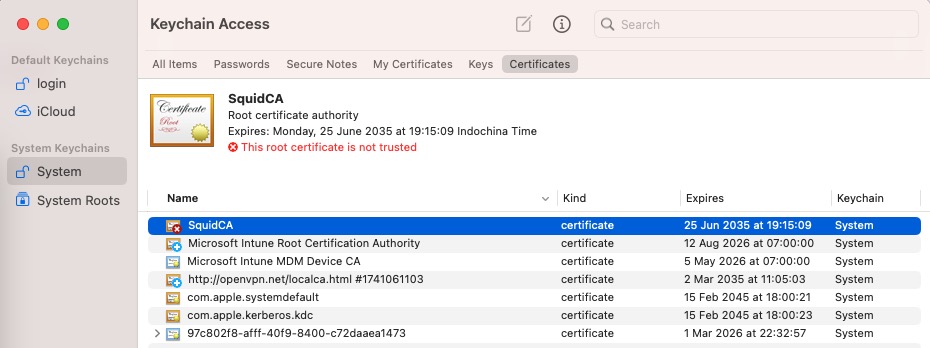
Click đúp vào chứng chỉ vừa thêm ➝ Mở mục “Trust”. Ở dòng “When using this certificate”, chọn Always Trust. Nhớ nhập mật khẩu máy Mac (nếu yêu cầu).
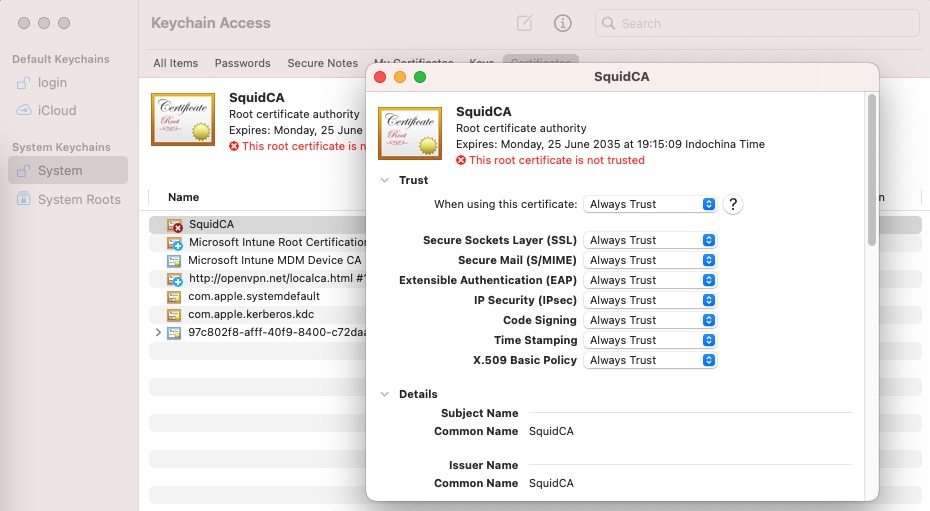
Đóng cửa sổ. Bạn sẽ thấy chứng chỉ không còn dấu đỏ (Not trusted).

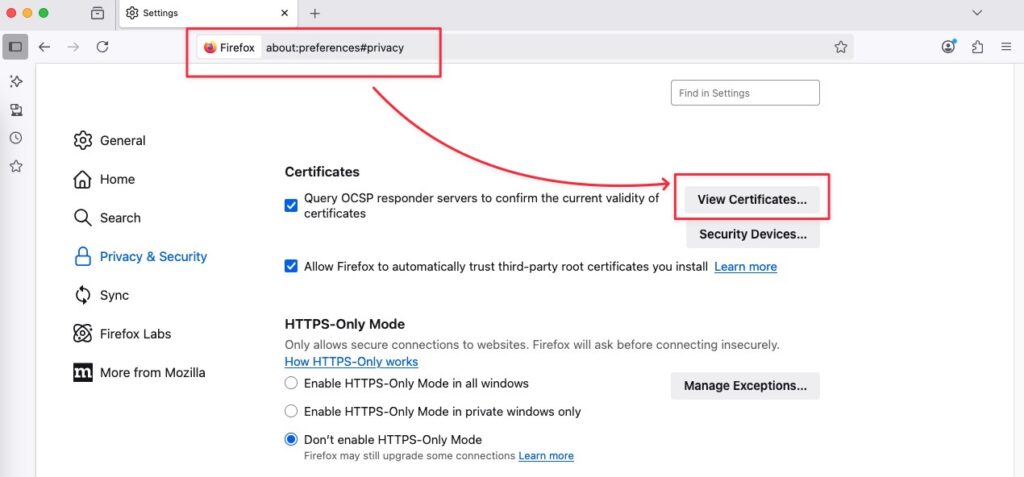
Cách 2 – Cách này áp dụng riêng cho từng trình duyệt nếu bạn không muốn thêm cert này vào hệ thống chung. Ví dụ này mình chọn Firefox, nếu bạn dùng Firefox hãy làm theo mình.
Mở Firefox ➝ Truy cập about:preferences#privacy. Cuộn xuống mục Certificates ➝ click View Certificates.
Tab Authorities ➝ Click Import.
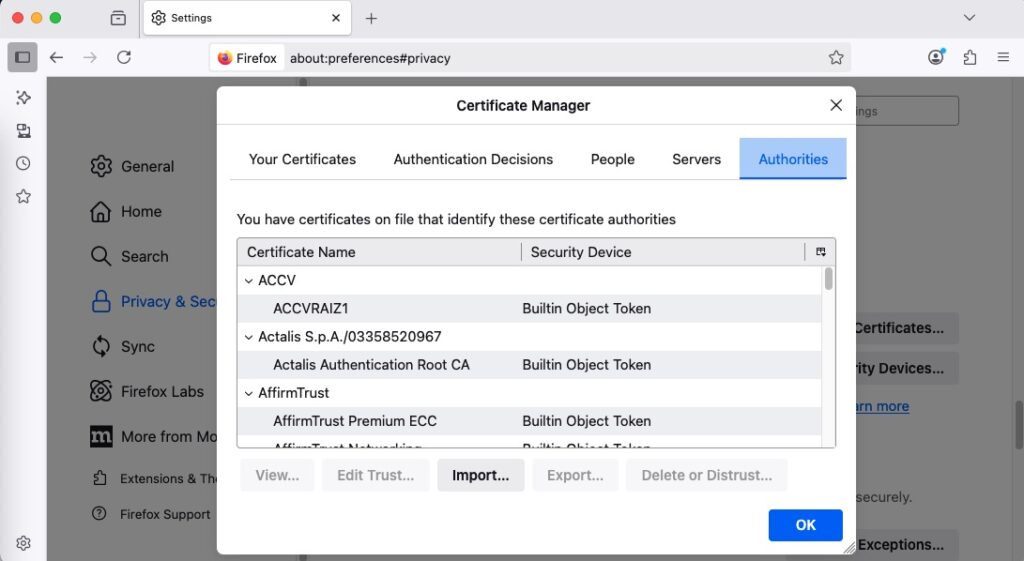
Chọn file myCA.pem, tick vào ✔ Trust this CA to identify websites (Không cần các tùy chọn khác) và nhấn OK.

Đây là log đầy đủ xem tại file /var/log/squid/access.json.
shell> tail -f /var/log/squid/access.json
{"ts":"27/Jun/2025:13:21:22 +0000","client":"192.168.100.102","code":"200","status":"NONE_NONE","bytes":0,"method":"CONNECT","url":"www.google.com:443","hier":"HIER_DIRECT/142.250.71.196","content_type":"-"}
{"ts":"27/Jun/2025:13:21:22 +0000","client":"192.168.100.102","code":"200","status":"TCP_MISS","bytes":448,"method":"GET","url":"http://detectportal.firefox.com/canonical.html","hier":"HIER_DIRECT/34.107.221.82","content_type":"text/html"}
{"ts":"27/Jun/2025:13:21:22 +0000","client":"192.168.100.102","code":"200","status":"TCP_MISS","bytes":366,"method":"GET","url":"http://detectportal.firefox.com/success.txt?","hier":"HIER_DIRECT/34.107.221.82","content_type":"text/plain"}
{"ts":"27/Jun/2025:13:21:22 +0000","client":"192.168.100.102","code":"200","status":"TCP_MISS","bytes":366,"method":"GET","url":"http://detectportal.firefox.com/success.txt?","hier":"HIER_DIRECT/34.107.221.82","content_type":"text/plain"}
{"ts":"27/Jun/2025:13:21:23 +0000","client":"192.168.100.102","code":"200","status":"NONE_NONE","bytes":0,"method":"CONNECT","url":"stacklab.vn:443","hier":"HIER_DIRECT/125.253.124.244","content_type":"-"}
{"ts":"27/Jun/2025:13:21:23 +0000","client":"192.168.100.102","code":"200","status":"TCP_MISS","bytes":448,"method":"GET","url":"http://detectportal.firefox.com/canonical.html","hier":"HIER_DIRECT/34.107.221.82","content_type":"text/html"}
{"ts":"27/Jun/2025:13:21:23 +0000","client":"192.168.100.102","code":"200","status":"TCP_MISS","bytes":366,"method":"GET","url":"http://detectportal.firefox.com/success.txt?","hier":"HIER_DIRECT/34.107.221.82","content_type":"text/plain"}
{"ts":"27/Jun/2025:13:21:23 +0000","client":"192.168.100.102","code":"200","status":"TCP_MISS","bytes":366,"method":"GET","url":"http://detectportal.firefox.com/success.txt?","hier":"HIER_DIRECT/34.107.221.82","content_type":"text/plain"}
✅ Kiểm tra
- Truy cập một trang HTTPS qua proxy Squid (ví dụ https://stacklab.vn/)
- Nếu SSL Bump hoạt động, bạn sẽ không thấy lỗi “Your connection is not private”
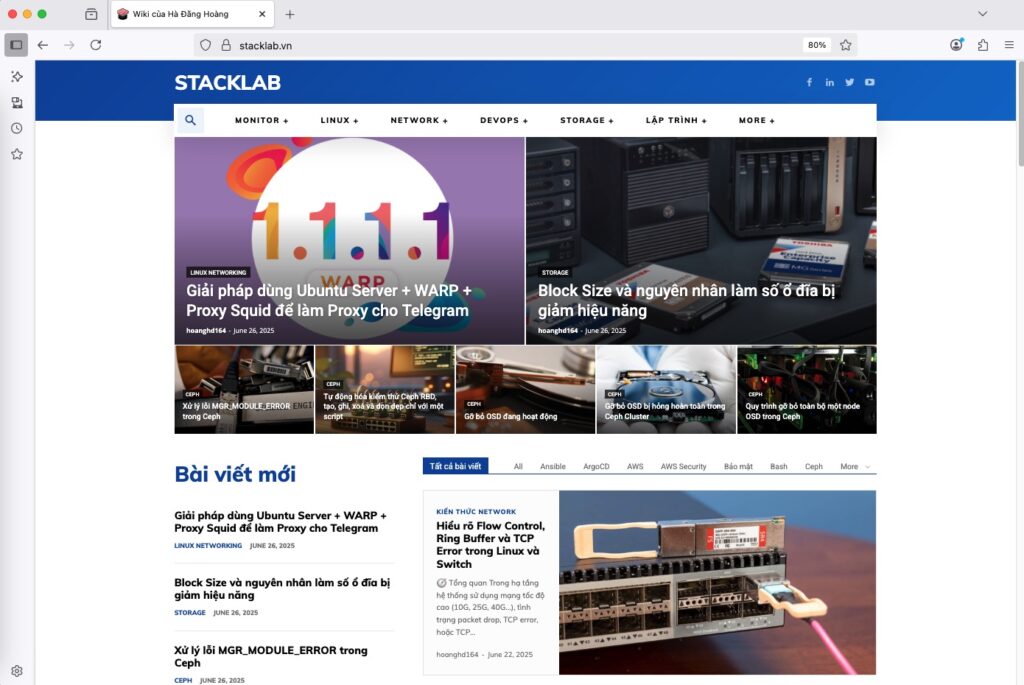
Kiểm tra lại bằng cách xem issuer là SquidCA (hoặc CN bạn đã khai báo).

Ghi chú thêm
| Trình duyệt | Có dùng CA hệ thống không? | Ghi chú |
|---|---|---|
| Safari | ✅ Có | Cài vào Keychain Access → System |
| Chrome | ✅ Có | Dùng chung với macOS System Keychain |
| Firefox | ✅ Có | Support cả 2 dạng. |
| Edge (Mac) | ✅ Có | Giống Chrome, dùng CA hệ thống |
Đây là log bạn sẽ thu thập được.
shell> tail -f /var/log/squid/access.json
{"ts":"27/Jun/2025:13:31:26 +0000","client":"192.168.100.102","code":"200","status":"TCP_MISS","bytes":206787,"method":"GET","url":"https://stacklab.vn/wp-content/uploads/2025/06/image-15-696x497.png","hier":"HIER_DIRECT/125.253.124.244","content_type":"image/png"}
{"ts":"27/Jun/2025:13:31:26 +0000","client":"192.168.100.102","code":"200","status":"TCP_MISS","bytes":236563,"method":"GET","url":"https://stacklab.vn/wp-content/uploads/2025/06/image-11-696x464.png","hier":"HIER_DIRECT/125.253.124.244","content_type":"image/png"}
{"ts":"27/Jun/2025:13:31:27 +0000","client":"192.168.100.102","code":"200","status":"TCP_MISS","bytes":44059,"method":"GET","url":"https://stacklab.vn/category/kien-thuc-network/","hier":"HIER_DIRECT/125.253.124.244","content_type":"text/html"}
{"ts":"27/Jun/2025:13:31:27 +0000","client":"192.168.100.102","code":"200","status":"TCP_MISS","bytes":304859,"method":"GET","url":"https://stacklab.vn/wp-content/uploads/2025/03/image-24-696x464.png","hier":"HIER_DIRECT/125.253.124.244","content_type":"image/png"}
{"ts":"27/Jun/2025:13:31:27 +0000","client":"192.168.100.102","code":"200","status":"TCP_MISS","bytes":68249,"method":"GET","url":"https://stacklab.vn/wp-content/uploads/2025/02/image-47-696x365.png","hier":"HIER_DIRECT/125.253.124.244","content_type":"image/png"}
{"ts":"27/Jun/2025:13:31:27 +0000","client":"192.168.100.102","code":"200","status":"TCP_MISS","bytes":99389,"method":"GET","url":"https://stacklab.vn/wp-content/uploads/2025/02/image-50-696x381.png","hier":"HIER_DIRECT/125.253.124.244","content_type":"image/png"}
{"ts":"27/Jun/2025:13:31:27 +0000","client":"192.168.100.102","code":"200","status":"TCP_MISS","bytes":179082,"method":"GET","url":"https://stacklab.vn/wp-content/uploads/2025/03/image-17-696x391.png","hier":"HIER_DIRECT/125.253.124.244","content_type":"image/png"}
{"ts":"27/Jun/2025:13:31:27 +0000","client":"192.168.100.102","code":"200","status":"TCP_MISS","bytes":447426,"method":"GET","url":"https://stacklab.vn/wp-content/uploads/2025/03/image-23-696x522.png","hier":"HIER_DIRECT/125.253.124.244","content_type":"image/png"}
{"ts":"27/Jun/2025:13:31:29 +0000","client":"192.168.100.102","code":"304","status":"TCP_REFRESH_UNMODIFIED","bytes":654,"method":"GET","url":"https://stacklab.vn/category/monitor/","hier":"HIER_DIRECT/125.253.124.244","content_type":"-"}
{"ts":"27/Jun/2025:13:31:31 +0000","client":"192.168.100.102","code":"304","status":"TCP_MISS","bytes":648,"method":"GET","url":"https://stacklab.vn/","hier":"HIER_DIRECT/125.253.124.244","content_type":"-"}
✅ Ưu điểm
- ✔️ Log đầy đủ URL kể cả HTTPS
- ✔️ Có thể lọc nội dung HTTPS theo đường dẫn cụ thể
- ✔️ Tăng cường giám sát mạng nội bộ cho môi trường doanh nghiệp, trường học
- ✔️ Linh hoạt trong cấu hình chặn website
❌ Nhược điểm
- ❗ Phải import CA vào trình duyệt client để tránh lỗi chứng chỉ
- ❗ Một số ứng dụng/phần mềm có SSL pinning sẽ không hoạt động
- ❗ Có thể ảnh hưởng đến quyền riêng tư nếu dùng sai mục đích
🔍 So sánh: Squid bình thường vs Squid + SSL Bump
| Đặc điểm | Squid thường | Squid + SSL Bump |
|---|---|---|
| Ghi URL HTTPS chi tiết | ❌ Không | ✅ Có |
| Chặn nội dung HTTPS | ❌ Không | ✅ Có thể |
| Yêu cầu cài CA client | ❌ Không | ✅ Có |
| Cấu hình phức tạp | ✅ Dễ | ❗ Trung bình |
🧠 Lời khuyên khi triển khai
- 🧪 Test kỹ trước khi triển khai diện rộng
- 🛑 Tôn trọng quyền riêng tư người dùng khi log nội dung HTTPS
- 💡 Cài đặt CA vào trình duyệt qua chính sách GPO (nếu dùng Windows domain)
- 🔐 Luôn bảo mật khóa CA (
myCA.key) vì nếu rò rỉ sẽ gây rủi ro nghiêm trọng
📌 Kết luận
Việc sử dụng Squid kết hợp SSL Bump để log đầy đủ URL kể cả HTTPS là một công cụ mạnh mẽ cho quản trị viên hệ thống, giúp kiểm soát và giám sát truy cập internet hiệu quả hơn. Tuy nhiên, tính năng này cần được triển khai có trách nhiệm, với hiểu biết đầy đủ về bảo mật, quyền riêng tư và pháp lý.
Nếu bạn thấy hướng dẫn này hữu ích, đừng quên chia sẻ cho cộng đồng và để lại bình luận nếu có thắc mắc!